
You are currently browsing the category archive for the ‘stuff for you’ category.

Well, Selfish readers, you’re in for a treat today because Selfish has a prezzie for you! That’s right, it’s another freebie pattern to download, and all I ask in return is that you sign your soul over to me in the comments. Sweet deal, right? Today’s pattern is for a wacky outerwear garment inspired by the Kate Spade Victoria faux fur pullover. (You can read about my own version in my last post.)

The Selfish Seamstress pattern is size XS, but should be quite easy for someone with intermediate skills to modify it for larger sizes by adding the desired amount of additional width at the center of each piece (back, front, sleeve, and collar.) It has a straight, roomy silhouette, raglan 3/4 length sleeves (or actually maybe more like 2/3) with a dart at the top of the shoulder, and a wide funnel collar that can be folded over if desired. It is also fully lined. The Selfish version does not include the front kangaroo pocket of the original Kate Spade, but it should be easy to add if desired.
IMPORTANT TIPS:
- I highly recommend that you read up on how to cut and sew faux fur if you have never done so before. There are many resources available online. I put together a tutorial on BurdaStyle a few years ago that may be of use.
- Note that the seam allowances are included in the pattern, and that they are 3/8″ (1 cm), NOT the standard 5/8″ on most Big 4 patterns.
- The construction on this garment is extremely easy (just 4 pattern pieces!) but I have NOT INCLUDED INSTRUCTIONS. I therefore recommend this for advanced beginners or intermediates.
- Pay attention to the direction of the pile on the fur. For my own version, I have the pile on the body and collar running sideways (necessary for the direction of the stripes) and on the sleeves the pile runs towards the back (i.e. if you had your arms folded across your chest the fur on the forearms would be running downwards.)
- MAKE A MUSLIN AND TRY IT ON FOR FIT. You will be sad if your expensive faux fur garment does not fit. And yes, it’s a roomy pattern, but most faux fur does not stretch and the garment needs to be big enough that you can pull it on and off over your head, unless you plan to add a closure of some sort. (I don’t recommend sewing a zipper to the fur as the pile is likely to catch in the teeth unless you have some sort of buffer between the zipper and the fur.)
For my version, I used:
- About 1.5 yards of faux fur, 60″ wide
- About 1.25 yards of silk twill for the lining, 45″ wide
You can find good quality faux fur on Etsy, including Tissavel, and this brown faux mink with channels that looks from the picture a lot like the original Kate Spade fur (note: I have never purchased this and cannot vouch for its quality or texture). Gorgeous Fabrics and Emma One Sock often have nice quality faux fur as well. I got mine on eBay but it’s now sold out. You could stick with basic brown to be true to the original, but I could also see this garment working in a bunch of colors and textures, like a shaggy gray or cream Mongolian lamb (fun!), a silky black mink (classic!), a dusky gray-blue (edgy!), or leopard (trendy!) I mean, it’s a fur shirt. Don’t take it too seriously :)
Ok, so, for those of you who are drooling over the notion of having your very own fluffy-chic Kate Spade Victoria-esque pullover, snag it now or head over to my Downloads page for this and other free patterns! It prints onto 18 sheets of US Letter or A4 paper that you’ll have to tape together. And again, I request payment in the form of souls, so please transfer ownership of them to me in the comments. Happy sewing and come back and show me what you make!
IMPORTANT: This work is my creation and my intellectual property, protected under a Creative Commons license. You may not use it for any commercial purposes, claim it as your own, or resell it (I’m looking at you, Geraldine/Lorriange.)

The Selfish Seamstress Kate Spade-Inspired Fur Pullover Sewing Pattern by The Selfish Seamstress is licensed under a Creative Commons Attribution-NonCommercial-ShareAlike 3.0 Unported License.
Oh my goodness, selfish readers, I cannot believe the outpouring of warm wishes in the comments on my last post. Thank you so very, very much for your many kind notes. Reading them almost makes Selfish wish that she had even a tiny little heart instead of a hard lump of rock in her chest, because if she did, she would surely have been very moved by all of your touching sentiments and congratulatory wishes. And so, as a gesture of something akin to gratitude, here’s a little present to you- a DIY project so quick, simple, and trendy, you’ll either say, “Now why didn’t I think of that” or “Duh, I already thought of that. You always think you’re so smart, Selfish Seamstress, but you’re really NOT.” (Also, there were some questions in the comments on my last post, so I’ll address them at the end of this post- stay tuned.)
While I was in New York, I happened upon these fantastic long leather and knit gloves at Kenneth Cole (I didn’t do much shopping on my last trip, but Kenneth Cole is so conveniently located in Grand Central that I can’t help but zip through from time to time.)
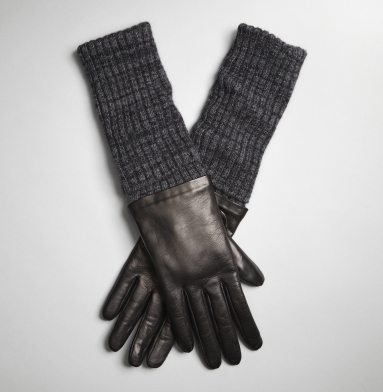
Now, $128 is not sooooooo ridiculous for leather gloves, but these are not the most practical style for everyday wear, as they’re not that easy to wear with, oh, say…. sleeves. So even with the 20% off everything sale they were having in the store, the math still wasn’t working for me:
$128.00 * 0.8 + NYC sales tax = still too expensive for novelty gloves
But I loved how edgy they were- a ladylike shape with a sort of urban industrial mix of materials. Some other $$$ examples:

A New York Times bit showcasing long gloves featured the Rochas pair (third from left) which retails for almost $1300 (undoubtedly looks much better with an arm in it)
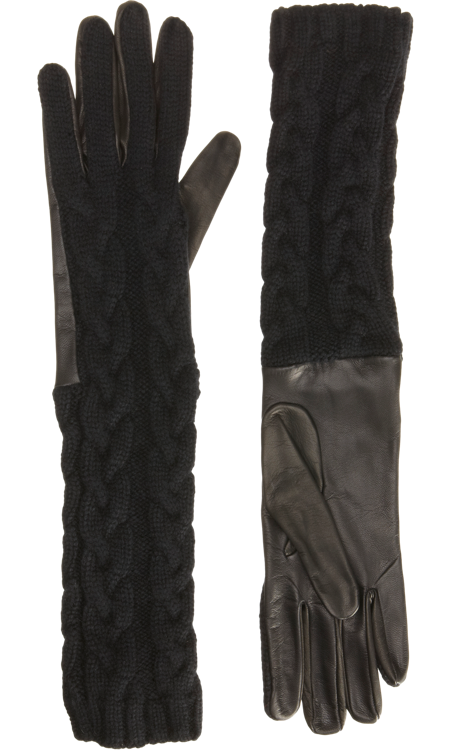
This pair of leather and cashmere cable knit gloves from Barney’s is $280.
And this pair from Asos can be yours for a mere $220.

And a pair from Echo Design for a comparatively reasonable $98.
What’s funny in retrospect is how it *didn’t* immediately occur to me to DIY these. I mean, “I’ll just make them” was my first thought when I saw the similarly mixed media Helmut Lang combo pants. Instead with the gloves I was all like, “Hmmm… how can I justify this purchase?” (In fact, perhaps the only thing that didn’t stop me from splurging on these at the Kenneth Cole store was the fact that I obviously had to splurge on this at the Kenneth Cole store:
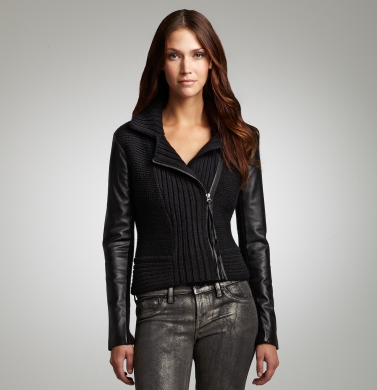
But that’s a story for another day.)
And what’s funnier still is how when it first occurred to me to DIY these gloves, my initial thought was “Oh! All I have to do is knit a couple of long ribbed tubes and stitch them to a pair of RTW gloves!” And it wasn’t until much later that it I thought to myself, “Or, duh, I could just use socks. You always think you’re so smart, Selfish Seamstress, but you’re NOT.”
Okay, so by now most of you can probably take it from here. But in case you want some step-by-step instructions, here you go.
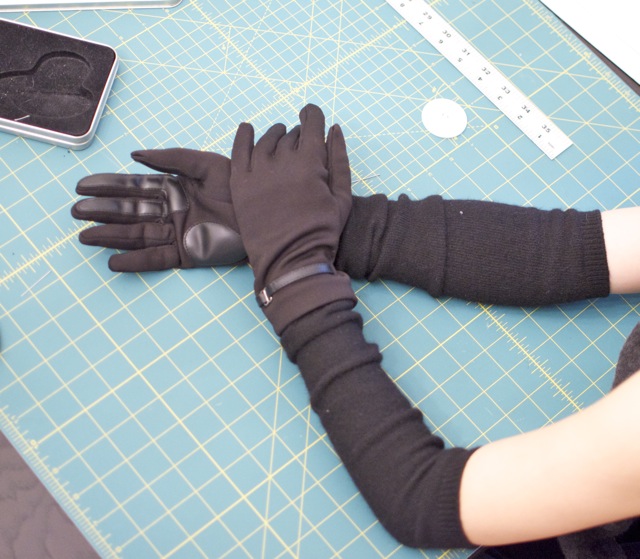
First, you’ll need some gloves. Leather or faux leather would be ideal for replicating the designer look, but I didn’t have any that I wanted to use for this project. I found an old pair of Totes smooth fabric gloves that my mom gave me but that I never wore much. They have some faux leather accents on them, so I thought they’d work well:

Then you’ll need some knee socks or over-the-knee if you want them really slouchy. You could get creative here with cables or Fair Isle socks, stripes, whatever. You could also use leggings or heavy knit tights, kids’ leg warmers, or slim sweater sleeves. I first went digging through Dan’s sock drawer, but when I didn’t find anything I wanted (why doesn’t he ever buy anything that *I* want to cut up and wear??), I went out and got a pair of heavy knee-high black angora blend socks (came in a two-pack with a white pair so there’s some white lint on them):

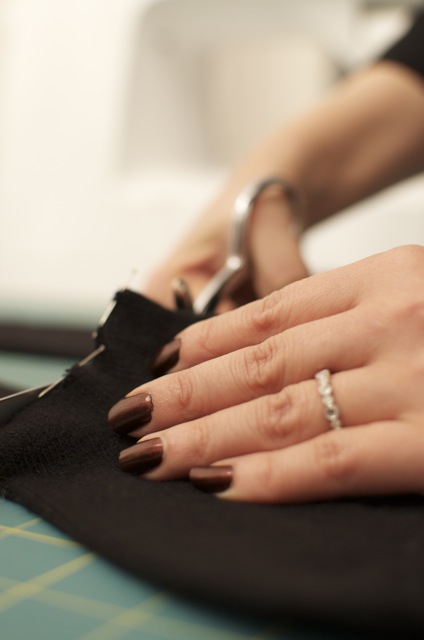
Now, measure a consistent length from the top edge of the sock to somewhere above the heel (I got 12.5″ out of mine) and mark them. I used pins because I don’t think chalk was going to show up on this fuzzy knit:

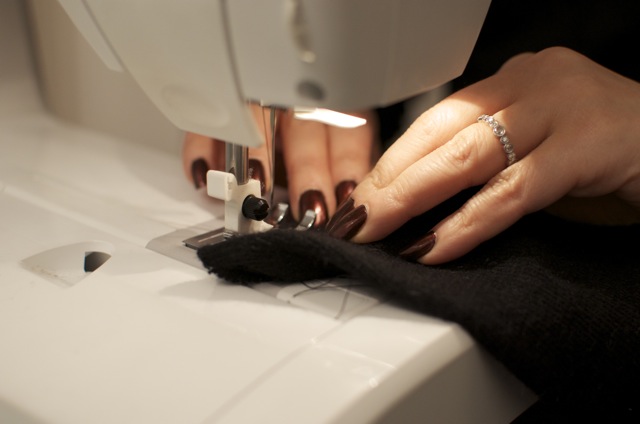
And cut at your marked line. (Dan photographed my “action shots” which is why the pictures with my hands in them are so much nicer than the other ones!)
Finish the cut edges to prevent fraying. I used a cover stitch on my machine. You could also zigzag the edge or use some sort of Fray Check type product.
My stitching caused the edge to ruffle a bit, but it shouldn’t matter.

Now, if you want, you could also cut the glove to make it shorter, or you could angle it (in which case you’d probably want to angle the cut of the sock) but I went for the simplest option which was to leave the glove as is and just stitch the sock into it. If you do decide to cut the edge of the glove and you don’t want any raw edges to show, what you probably want to do is put the glove and the sock with their right sides facing each other and edges lined up (i.e. right-side-out glove inserted into inside-out sock) and then stitch and flip the sock right side out. But since I wasn’t cutting the glove, I did the following:
Turn both the glove and the sock inside out:

And insert the top of the glove into the sock.
Pin evenly all around:
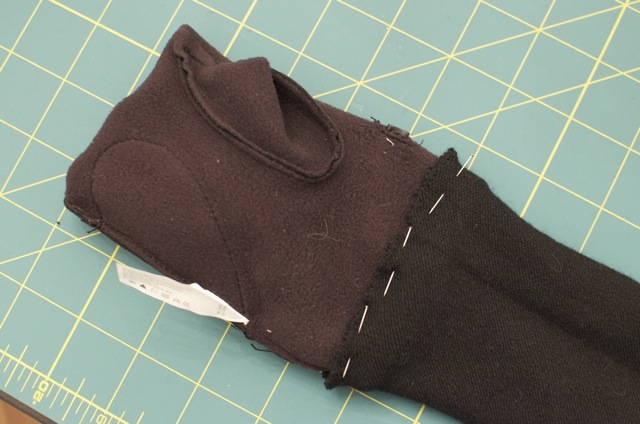
And baste, easing the sock and glove as necessary for a smooth join. Be sure when stitching that you’re not stitching through and picking up both the front and the back of the glove, thereby sewing the glove shut at the wrist. Gloves that are closed at the wrist are not conducive to wearing.
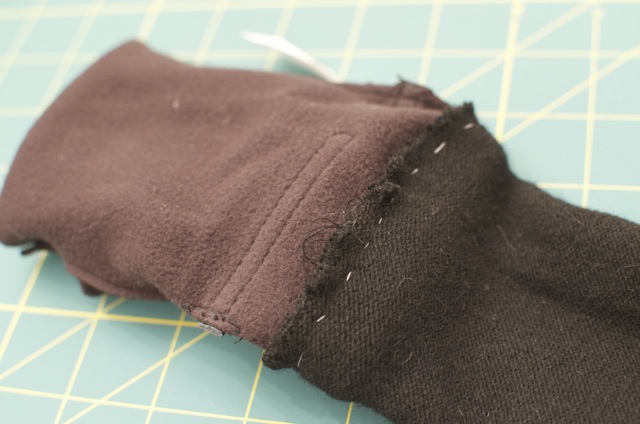
Now carefully turn the whole thing right side out:
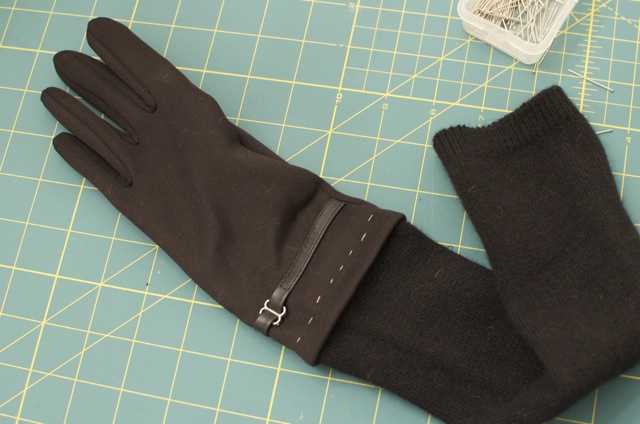
And stitch the glove to the sock. If you have a sewing machine with a sufficiently skinny free arm you can do it on the machine using a zigzag stitch or a stretch stitch. My machine’s free arm is a bit… how shall we say… “big boned” … so I did this stitching by hand. I didn’t stitch along my basting- I just used the basting to hold everything together. Instead I stitched invisibly very close to the edge of the glove, just on the inside of the hem. And the final product:

A pair of socks and a pair of old gloves, frankened into a reasonable facsimile of super expensive long mixed media gloves! (Incidentally, does anyone remember that Halloween episode of Community in which Troy and Abed exchange Pierce’s hands with his feet and then he can’t grope the butt that they attached to his chest? So awesome. Creating hybrid sock-gloves made me think of that episode. Also, Community is back next week! Excited though tentatively so because of the changes in writing staff and showrunner. Digressed!)
Perfect accessory for your cape, three-quarter sleeve coat, or in my case a wrinkly knit poncho:

And super quick to make too. I think I have a pair of old tan leather gloves somewhere so I might try another pair with brown cable knit socks, though it’s not really the sort of thing one needs a lot of in one’s wardrobe. If you make any, come back and show me how they turned out.
Ok- and response to some of your questions and comments:
- Hahah, I think it’s cute that some of you think wedding planning is what’s been keeping me from sewing and blogging :) Our wedding planning was pretty much just this: “Mommy, can you get some food for our wedding?” “Dan, go make some tissue paper flowers for the decorations.” “Make sure I get TWO slices of cake. It’s MY WEDDING.”
- @BMGM: I still don’t entirely know what skirt stiffener is, whether it was just a synonym for interfacing, or whether there was actually a product you could buy that was specifically referred to as “skirt stiffener” – but it definitely wasn’t horsehair braid. The stiffener is cut from the same pattern as the skirt, basted to the skirt, and then the two layers are treated as one, like interlining.
- @Jo: Glad to hear that you were able to make the kimono sleeve adjustments. I don’t have any pictures, but I think I did the same thing as you- trial and error until it fit smoothly. I’m sure there is a logical and correct way to do this fit adjustment, but I have no idea what it is!
- @Isaspacey: Thanks for the terminology! And I love that phrase- “mounting a skirt.” Sounds like 1950s innuendo.
- @Rena & Hellene: I am a jerk. I totally haven’t gotten the pictures of you guys and Desi and me from when we met at Metro! Post is coming eventually, and yes, I am an a*hole for being so lax about it! Hugs to you guys!
- @Phoebe: YES! Sharp eye there, sister! Dan was wearing a barong for our reception, sent to us from my cousin in Manila. Our reception food was Filipino and deli, a nod to our Philippine and Jewish roots :) Funny how non-Kosher a meal can become once you have a lechon in the mix, btw.
Thanks again, everyone for all of your kind wishes for our future and the compliments on the dress. Now go make some gloves and come back with chic results!
You guys, I think it’s going to be a good day. I’m wearing my stare-at-me-you-SOOO-wish-you-could-pull-these-off boots:

And even better, Community is finally back on the air. It’s definitely going to be a “six seasons and a movie” kind of day. [IMPORTANT: I have not watched last night’s episode yet. Do NOT tell me what happens! You spoil my Community and I will SPOIL YOUR FACE.]
So Selfish is feelin’ fine today. Not cheerful or sweet or generous, of course, but ever so slightly less vindictive than usual. One might even say that I am feeling fair. So I’ll make you a deal. You help me out, and I will divulge valuable information that I have thus far been keeping to myself out of pure selfishness. K?
K. You help me first, obviously. There’s an odd little boutique right near our apartment that seems to be open only by appointment (i.e. it’s NEVER open), and always has the most magnificent Issa silk jersey dresses displayed in the window. They recently switched the featured dress to an absolutely drool-worthy candy striped confection with a cowl neckline. I snapped a pic last night with my phone, which doesn’t do it justice:

As you may know, Selfish is fairly new to sewing drapey (i.e. non doubleknit) knits. But she wants her own version of this dress rather desperately. The stripes are throwing me though, as it’s not obvious to me whether the stripe print runs vertically on the jersey, or diagonally, and what’s cut on the bias versus the straight grain. If this were a woven, I feel fairly sure that the bodice front would have to be cut on the bias in order to achieve that drapey waterfall neckline. And yet as I poke around the internets, it seems like it is possible to achieve that neckline drape with a knit fabric cut on the straight grain. Yes? No?
If the stripe print is vertical, that means that the skirt is cut on the bias and everything else is cut on the grain. Wouldn’t this make the skirt rather prone to growing in length over time?
If the stripe print is diagonal, then the bodice, sleeves, and waist wrappy things are cut on the bias, and the skirt is cut on the straight grain. Are bias cut sleeves even a thing with drapey knits? Has anyone done that?
Okay, collective human sewing brain- what gives with this? What’s going on here? And even more importantly, where could I find a fabulous diagonal or vertically striped knit fabric? Silk jersey would be great, but I’d settle for ITY knit. NOW ANSWER ME.
Well, that’s about it for today. Catch you later. Oh wait, what are you saying? I promised you some important secret sewing info? Sigh, fine. I’ll hold up my end of the bargain. But only because I have that episode of Community to look forward to later and it’s keeping me “amiable.”
Remember the insane South Park silk chiffon I told you about the other day? Well, the only reason I even noticed that bizarro fabric is because it was in the same eBay store as another extremely covetable fabric of which I purchased 3 yards. That’s right- I knew that the eBay store had a ridiculous fabric as well as one that you’d probably really really want if you knew about it, so naturally I told you only about the former and kept the latter a secret. Even though I knew there was plenty of it left for you. It’s all part of my plan to keep myself gorgeously garbed while the rest of you traipse around wrapped in South Park and jealousy. Serious bitch move, and one that I’m proud of. But, since you’re helping me out with the striped jersey issue, here you go:

Yep, it’s Marc Jacobs silk crepe de chine, 45″/114 cm wide, in oh-so-trendy bird print, going for a pretty reasonable $14.99/yard. And I love that little teal blue bird with the purple cap. He’s definitely my favorite. Here’s what Mr. Jacobs did with the fabric:

This print made appearances in the Marc Jacobs 2010 resort collection. I haven’t received my fabric yet so I can’t say anything about it regarding quality, but I have high hopes and big plans.
So there you go. Feel free to express your undying gratitude below.
[UPDATE: Wow, you guys bought that up that Marc Jacobs fabric fast. Here’s the link to a new listing for more of it.]
[UPDATE #2: Well, my greedy little monsters, looks like you have bought it all up and there’s no more left! Good job!]
[UPDATE #3: And it’s back! Get it while you can!]
No doubt we’ve seen some pretty weird fabric out there. And if you spend most of your waking hours trolling the internet for fabric, as the Selfish Seamstress does, pretty much no fabric subject matter surprises you anymore. If something exists, it’s been printed on fabric.
But yesterday I discovered what I believe is the weirdest fabric I’ve seen on the internet, not because of the print, goofy but not completely out there, but because of particular combination of print, fiber, and weave. Are you ready for it?
It’s SOUTH PARK PRINT 100% SILK CHIFFON.

Oh yeah. It’s 100% filmy, diaphanous silk chiffon, so it’s perfect for a lovely frock for a garden party, wedding, or a trip to the Oscars, but it’s also got a whimsical all-over South Park print, which makes it just right for a 14-year old boy in the year 1998. Let’s take a closer look, ok?

Awesome. You can get it here, btw. How about you? Seen any other super wacky fabrics or incongruous print/fabric combos lately? Anyone keen on making a filmy little South Park number now?

Okay, a bunch of you asked about the shoes I was wearing in yesterday’s post on my Heidi Merrick-inspired dress. They are Nine West’s “Elona” model in desert nude (they also came in black), and they are ridiculously comfortable for stilettos. I can wear them the whole day with no pinching, chafing, fatigue, aches, or soreness. I can walk at my usual New Yorker “get-the-f-out-of-my-way-you-stupid-tourist” pace in them. Yesterday they were sold out, but as of THIS VERY MINUTE (3:05AM EDT, August 16th, 2011), there is ONE SIZE for sale on the website – size 9M for the bargain basement price of $29.75.
Go! Go now, all you size 9M women! And if they’re already gone by the time you get there, don’t look at me. I may be selfish, but I’m a size 5. And I, unlike you, already have them. Also? Nanny nanny boo boo.
Update: As of 12:45PM EDT, it appears they’re once again sold out! Sorry, kids!

The Envy Scarf is now complete and wrapped deliciously around my Selfish neck twice, but you’re going to have to wait for pictures. In the meantime, apparently the idea of knitting an entire scarf in fingering weight yarn appeals to some of you (clearly bored loners, much like the Selfish Seamstress herself). So to relieve you of your scarf envy over the Envy Scarf, or perhaps to inflict upon you the same mind-numbing boredom that I have just endured in making it (oh sorry, knitters, I meant “relaxing” and “therapeutic” means of “unwinding,” geez.), here is the very classic feather and fan pattern:
Cast on 78 stitches:
Row 1: K
Row 2: P
Row 3: K3, * (K2tog) 3 times, (YO, K1) 6 times, (K2tog) 3 times. Repeat from * until 3 stitches remain. K3.
Row 4: K
Repeat all rows until desired length is reached. Bind off loosely.
For my scarf, I used a 4.5 mm circular needle and about 1 and 2/3 skeins of Lang Jawoll Magic in shade 99 (Greens), but you can use whatever you want, not only because gauge isn’t important, but also because… well, did you honestly think I would care?

Many a sewing blogger and sewing enthusiast sighs over the lovely early 60’s style costumes featured on Mad Men, and the Selfish Seamstress is no exception, despite never having even seen an episode of the show. I’m sure I’m not the only one who has promised to make herself a Mad Men style wardrobe someday or at least a couple of pieces. I’m also sure I’m not the only one who hasn’t gotten around to making that wardrobe and quite possibly never will.
Take heart, readers, all is not lost, especially if you’ve got some spare change (or possibly spare trust funds) lying around. The producers of Mad Men are holding a charity eBay auction to benefit City of Hope, and they are selling off, among other things, DRESSES. Yes, actual dresses and garments from the show. And furniture and props and even a walk-on role for the theatrically-inclined among you. More info here and here, and the auction runs from August 12th-22nd. I don’t expect to be bidding, but I’ll be peeking for sure. And if you win anything, come back and show us!

A Coffee Date Dress by Tina!
Well, everyone, after much struggling with WordPress, I have put the Selfish Reader Gallery online! Thanks to everyone who has submitted a photo so far of their Selfish Seamstress pattern creations, and please keep them coming. I can’t believe how pretty and creative they all are- great work Selfish Readers! I had some technical struggles and unfortunately was not able to link to people’s blogs in the photo captions. Right now the gallery photo links to people’s blog URLs if they sent me one, and to the full-sized photo if they did not. This is really not ideal, but I’ve spent about an hour and a half trying different solutions and will have to put off my investigations for another day. Because…
… after a week’s worth of procrastination, I *really* have to get back to sewing the BurdaStyle book coat! It MUST get done this weekend, which means another self-imposed sweatshop for me. Dan’s gone off on a grueling hike, the kitchen is stocked with fruit and cookies, and I’ve got my good buddies Biggie, L.L., Missy, Big Boi, Revened Run and DMC queued up on the playlist to help out. And I’m going to need all the help I can get.

You may be surprised to know that the Selfish Seamstress’s job is neither seamstressing nor being selfish. Remarkably, she does not get paid for either, even though she spends a fair bit of her free time sewing and is selfish pretty much all the time. No, she has a day job that often bleeds well into the night, which severely limits her sewing time (but does not much affect her selfish time.)
As a scientist, one of the key measures of professional success is impact. Impact is fiendishly hairy to assess or quantify, though there are some indicators. To oversimplify things a bit, one common indicator of the impact of a scientific work is the frequency of its citation. That is to say, if I write a scholarly paper on a piece of research that I have conducted, the more times other scientists reference the paper in their scholarly papers, the higher the impact. It therefore stands to follow that if you are a scientist and you have a paper that many other people have used in their work, you should be quite proud of its impact and subsequently the success of your research.
According to Google Scholar, my most cited paper has been referenced 114 times by other scientific papers. For my particular field of research, this is not bad. It does not make me a luminary in my research community, but it’s certainly not a shameful number. It could be argued that the work has had some impact. Compare this, however, to my pattern for the Coffee Date Dress, which has been downloaded on the order of 50,000 times from my blog, BurdaStyle and perhaps a couple of other places as well. As a scientist, my little selfish heart thrills at the thought of the pattern having had some impact, of having produced something that might actually be useful. To think that someone whom I’ve never met, living thousands of miles away might be wearing a Coffee Date Dress right now just gives me the giddies.
So, with that long preamble, I’ve decided to add a Selfish Reader Gallery to my blog, to show off the impact of my patterns while gently patting my oversized ego give beloved readers the opportunity to display the fruits of their labor made with Selfish Seamstress patterns. Have you made a Coffee Date Dress, Minimalist Cowl, or other Selfish Seamstress pattern? (Yes, I know I still owe you the pattern for the Sugar Snow Dress – it’s coming, don’t worry!) Do you want to be featured in the Selfish Reader Gallery? If so, send me a photo of your creation at selfishseamstress [at] gmail [dot] com with the subject line “Gallery”, and if you want me to link to your [preferably sewing-related] blog or webpage, send a URL as well.
All you Selfish Readers, here’s another opportunity for glory!

Remember the Pants-with-a-bow crazypants from a couple of days back? Some of you asked for a tutorial on the waistband, which I will now condescend to sort of give to you, despite an extremely pathetic lack of offers of gifts in return. I do have to warn you, however, I stopped taking pictures partway through the sewing process, because honestly, I really can’t be bothered to think about your needs when I’m sewing. Okay, let us begin.
This tutorial assumes that you have some knowledge of how to assemble a pair of pants or a skirt with a waistband and zipper. It also assumes you have a pant/skirt pattern with a curved waistband, or that you can draft a waistband from an existing pattern or sloper. I drafted a wide, 2.5″ waistband for my pants. You should have a front waistband and a back waistband. If your pattern has a waistband that has a seam in the center back, no seams at the side, and closes in the center front, you’ll need to create a front and back waistband from it. Create the back waistband by slashing the piece where it meets pant side seam, removing any seam allowance at the center back end, and mirroring it at the center back to create an arc that will go from one side of your waist to the other. Use the other piece to create a front waistband in the same fashion, remembering to remove anything that goes past the center front, such as extended tabs, etc. If you use seam allowances on your pattern, add them back in at the sides.
Okay, with me so far? Here’s what your back waistband will look like. See how it’s mirrored at the center back? Now first, (not pictured) MAKE A COPY of your front and back waistband patterns. They will be the patterns you use for the inner waistband. This is the outer waistband. Draw a line 2″ from side edge at one side (2 5/8″ inches if you’re using a 5/8″ seam allowance) like so. I should note that I actually did my waistband drafting backwards by accident. You’ll see here that I drew this slash line at the right side of the waistband, but it should actually be at the LEFT side if you want your the bow on your left hip (I fixed this when cutting my just flipping my pattern over.)
Ok, now slash at the line you just drew. This will create your back outer waistband and side-back outer waistband pieces:

And if you’re using seam allowances, don’t forget to add them back in to both pieces:

As you can maybe see, I drew in some notches for matching.
Then do the same thing to the front outer waistband (again, I did this backwards by slashing on the left side, but I should have slashed on the RIGHT side):
 In the end, here are both outer waistbands and outer side waistband pieces:
 The way the construction works is that you’re going to create two long sashes, and each of them will get “sandwiched” in that slash. Make sense?
Now we draft the bow. I made each of my sashes 32″ in length. I did this by tying a mini USB cable at my waist and determining how long I wanted it to be. You could make yours longer or shorter, as you like. The important thing is that the WIDTH at the end where it meets the waistband should be THE SAME AS THE WIDTH OF THE WAISTBAND.
Start drafting the bow by drawing a line the intended length of the bow, 32″ in my case:

Then at one end of the line you just drew, square off a line that the same length as the intended finished width of your waistband. In my case, the waistband is intended to be 2.5 inches in width after sewing, so I drew a 2.5″ long line, with my original line meeting it at the center:

At the other end of the line, square off another line. For my sashes, I wanted them longer at the bottom than at the top, so I squared off a 5″ line:

Now, connect the ends of the short lines to form the seam lines of the sash. If you would like the bottom edge of your sash to be angled, draw that angle in:
 If you’re using seam allowance, add that in as well on all sides. Here is the finished sash pattern. The center line can serve as your grainline, unless you would prefer to cut the sash on the bias (I did not):

At this point, I stopped taking a lot of photos and you’re just going to have to rely on your mind’s eye and your smarts. Cut one inner front waistband and one inner back waistband (remember the original waistbands I asked you to put aside at the very beginning?) from your fabric. Also cut one outer waistband (front and back main pieces, and front and back side pieces) from your fabric. Cut the sash twice on doubled fabric (four sash pieces in total).
With the right sides facing, pin the sash pieces along three sides, excluding the top edge where the sash meets the waistband, and stitch. Ooh, sorry for the weird photo angle:

Trim the seam allowances along the three sides, clip the corners, turn the sashes right side out, and press. That’s it, now I’ve really run out of photos.
Interface all the waistband pieces.
Take the back outer waistband and pin it to the side back outer waistband right sides facing, with one of the sashes sandwiched in between. The edges should match up with the top edge of the sash, and the sash should be centered such that it does not extend between the top and bottom seam allowances of the waistband. Stitch. You should now have a complete back outer waistband with a sash coming out of it.
Repeat the process for the front outer waistband and front sash. You should now have a complete front outer waistband with a sash coming out of it.
Stitch the front outer waistband and back outer waistband together at the right side to form a complete outer waistband with sashes. Press.
Stitch the front inner waistband and back inner waistband together at right side to form a complete inner waistband (keep in mind that the inner waistband will be facing inwards towards your body when you are wearing it, so this will look like the reverse of the outer waistband).
Assemble your pants or skirt as desired or according to the pattern instructions, leaving an opening on the left side for your zipper.
Stitch lower edge of outer waistband to top edge of pants or skirt right sides facing, being careful not to catch the sashes in the stitching. Press.
Stitch inner waistband to outer waistband right sides facing at top edges. Turn inner waistband to inside of pants and press.
Install side zip and finish inner waistband as desired. (I usually turn the seam allowance of the inner waistband to the inside, and slip stitch it to hide the seam allowances of pants and the outer waistband.)

Okay, hope you could follow all that. If so, ta-dah! Pants with a bow!

Hi everyone, thanks for your concerned messages, and for the gentle (and some not-so-gentle!) prompts for the Elan 510 bra pattern giveway. I’m doing okay here but will probably be sparse on both sewing and blogging for a bit.
I finally went through the comments, and my goodness! I learned so much more than I ever wanted to about everyone’s unique mammary situations, and also that people are generally not so good at following essay instructions :) Granted, a small number of you did actually manage to explain why you deserve the bra pattern and why no one else deserves it within a slim 100 words, but really, uh, not so many.
So because Selfish makes the rules here, Selfish can change them at her will, and she’s awarding the pattern to one of the many who didn’t follow instructions. After reading so many sad sob stories about “girls” too big or too small for department store offerings, figures ravaged by nursing and pregnancies, natural lopsidedness which render symmetrical bras useless, foundation garments worn down to decaying threads, I have to admit that my heart-of-ice thawed just a tiny bit. After all, the Selfish Seamstress knows too well the frustrations of the lingerie fitting room. And she had no idea that her blog was frequented by so many suffering women! But surely reader Amy had the most pathetic story of all, like a kitten with a missing leg wearing a big cone around its neck bumping into walls:
“I deserve it because I have the chest of a 12 year old boy. Victoria’s Secret laughs at me… the only bra they have that might fit is one that “enhances” me by 2 sizes, making me look like a schoolgirl that just overstuffed her bra with tissues. So, now I, a 37 yo woman, have resorted to wearing her 15 yo daughter’s outgrown training bras. What I wouldn’t give (or take!) to be able to make a lovely bra that made me feel like I could shop in the grown ups dept!”
I mean, Amy was not the only reader to admit to resorting to training bras as an adult, but HAND-ME-DOWN training bras?? From one’s teenage daughter?? Is there any mammary dignity left after you ask your offspring if you can have their castoff underwear??
Yes there is! When you win a free bra pattern. Congratulations, Amy! I hope we can put an end to this oh-so-wrong situation. And I hope you never again have to leave a comment on anyone’s blog about how you wear your kid’s outgrown undergarments. Drop me an email at selfishseamstress[at]gmail[dot]com with your mailing address :) The rest of you should wander on over to Sew Sassy and snag your own because it sounds like a lot of you have some real bra issues that you need to deal with.

In sadder news, my wonderful grandmother passed away last weekend at the age of 103, painlessly, and in her sleep at home. Growing up I did not have the opportunity to see her often, but she was a clever, spirited, and giving person whom I am fortunate to have known. Some of my fondest memories of her are of sitting on the living room floor with her at the age of 8 during one of her rare visits to the US, utterly enraptured as she taught me how to knit. It never occurred to me to ask her how someone who had spent almost her entire life in the sweltering tropics with no air conditioning and little time for leisure even knew how to knit. I guess it’s just a grandmother thing, and for that I’m grateful.
I’m going to take a short hiatus from sewing to revisit knitting. And in honor of my Ahma’s generous spirit, I will knit for someone else.
It’s a great, great day. I received my package in the mail from Sew Sassy, containing my Elan bra pattern and Sew Sassy bra kit, joy of joys! Only after I opened the package, I realized that Sew Sassy had included the wrong pattern. I had ordered B540, but they had sent B510, their front close underwire pattern:
 So, what makes it a great day if I received a pattern in the mail that I don’t want? Well, I emailed the good folks at Sew Sassy, who very kindly promised to send the correct pattern in the mail and said not to bother sending the B510 back. As they put it, “If you can’t use it, perhaps you have a sewing friend that can.”
But of course, as we all know, the Selfish Seamstress has no friends! Not a one! So she’s going to toss it into the reader pool as a giveaway, which means that once again, she can use this delightful windfall to turn all of you against each other like a pack of wild dogs fighting over a package of raw hamburger, an idea which delights her to no end. I’m sure even the vegetarians in the crowd will overlook that imagery for a nice bra pattern, right?
And you don’t even have to share the Selfish Seamstress’s, er…. maidenly contours to use this pattern, because it includes sizes 32A-D, 34A-D, 36A-DD, 38B-DD, and 40B-DD. It’s printed on nice sturdy paper too. And of course, you can get everything you need to sew it up from Sew Sassy. You can even opt for one of their handy bra kits (pattern not included in their kits.)
The Rules.
You have to do two things if you’d like to be considered:
1) Wander on over to Male Pattern Slander (lately quite the hotbed of lies about your poor, defenseless Selfish Seamstress) and leave a comment to let Peter know that in answer to his question, yes, the Selfish Seamstress does indeed have great taste in patterns
AND
2) Leave a comment here on this post of 100 words or fewer stating why YOU deserve this pattern and NO ONE ELSE does. That second part is important. Seriously, girls, get your b faces on. In the estimation of the Selfish Seamstress, there’s not enough strife in sewing… yet.
Judging will be based on which comment makes me cackle in evil glee most loudly. Random number generators are only for those who believe in “fairness.”
Disclaimer 1: I assume it should be reasonably affordable to send this pattern to most places in the world, but if I take it to the post office and the cheapest shipping option is still more than $10, I reserve the right to throw it back into another giveaway.
Disclaimer 2: Judging by how glacially slow I was to send out the prizes from my last giveaway, the winner is expected to nag me repeatedly until they are sure that I have actually put it in the mail. Otherwise I have a high likelihood of flaking :)
Oh, let’s say you have until Friday at 11:59 PM Eastern time. Okay?
GO!
The weather up by the Selfish Seamstress’s igloo has taken a turn for the nasty, and here we are on the 4th of May suddenly facing bitter wind and lots and lots of swirling snow. Surely such a phenomenon can only occur when you bet on the sewing gods over the weather gods, and then the weather gods have to remind you that the sewing gods are very, very small peanuts indeed compared to something as powerful and global as weather.
I forgot about that delicate balance last night and decided to indulge in some warm weather sewing for the first time this year, even though the weather has yet to turn warm. Even though my Madwoman dress has barely progressed since you last saw it, I couldn’t resist the draw of that gorgeous birthday voile any longer. Having it in my stash was like knowing there is a full pint of mint chocolate chip ice cream in the freezer- I couldn’t just pretend like I’d get around to it later. So I pulled it out, all crispy and shimmery, along with a vintage pattern that was unfortunately missing some pieces, some paper for drafting, and some muslin. A little drafting, some adapting and editing, and after a mere two hours I had this:

What’s that you say? You can’t figure it out from the picture? Hahaha, that’s because it’s a secret. And it’s a secret because after it’s done, I’m going to upload the pattern so you can make your own. It’s been a while since I’ve put up a pattern for you, and I like to keep you guessing. It makes me feel powerful.
Suffice it to say, after that dizzying summer sewing frenzy last night, delicate cotton voile flying everywhere, pins scattered all over the floor, I woke up this morning to a blizzard. I guess I won’t be wearing this anytime soon. But maybe you will!
Oh, okay, fine. Here’s my inspiration pattern. Twist my arm a little, why don’t you.

The Selfish Seamstress must be feverish today. Nothing else could possibly explain the sudden overwhelming burst of generosity that has overcome her- a generosity that she suspects she will come to regret, a generosity that tastes foreign and bilious in her mouth, a generosity that she will probably later decide you did not deserve. But by then it will be too late.
First, a word on wearing curtains. If it’s good enough for Scarlett O’Hara…
 And it’s good enough for the Von Trapp family…

And it’s good enough for the magnificent Melissa of Fehr Trade (okay, to be fair, her beautiful Burda dress is made from a shower curtain, rather than drapes per se, but same concept)…

… isn’t it good enough for you too?
Most notably, don’t you think you need the new spring Vogue 1174 Cynthia Steffe dress…

… sewn up in these vintage new old stock (i.e. they’re vintage but have never been used) drapes?


As of the time of writing this post, these lovely pristine drapes are available on eBay (yep, to the folks who were asking where I get my vintage fabric, that’s my main source). Two panels of 24″ by 84″ (though I’m guessing that width would probably be greater once if you let out the pleats, not exactly sure how pleated drapes are measured) for a not too unreasonable $59.99. It’s a Buy it Now, so first come, first served! (If you’re reading this post and someone already got to them first, haha, sucka!)
No, I’m not the one selling them so I can’t tell you anything more about them other than what’s on the eBay description. I have, however, eyed them longingly a couple of times in the last few days before reminding myself that I don’t need any more dressy fabric. Or any more fabric that matter. But if you want them, get them now before I have a change of heart. I can already feel the selfishness bubbling up inside of me, and it’s starting to make me wonder if maybe you just don’t deserve them. Go!
[UPDATE #2: Yikes, Für Sie has totally redone their website since I posted this over the weekend, and now I can’t find any of their sewing or knitting instructions anymore! I’ll keep hunting and post a new URL if I find them. Sorry!]
Well, seeing as how I’ve made zero progress on Burda 8.2009.128, I may as well just blather on about other sewing-related stuff to you, right?
I just discovered a couple more new cute freebie patterns for some easy, drapey garments for summer. They are this darling little drawstring tank dress, a knockoff of a current season Tim Hamilton dress:
 And a drapey wrap overblouse and tank combo, a knockoff of a current season Maurizio Pecararo outfit:

And now for the catches. Yes, once again the instructions are in German, put out by the magazine “Für Sie.” Hey it’s not my fault that German women’s magazines make an effort to give you lovely designer knockoff DIY projects and English language magazines don’t! But really, the patterns themselves look so simple (one or two pieces per garment!) and there are some illustrations to the instructions, so you can handle it, right? Oh yeah, and you have the scale the patterns up as well because they’re not full size.
Hey, don’t shoot me, I’m just the messenger. And wouldn’t you rather I share my freebie findings with you than keep them to myself? :D
The patterns and instructions (as well as instructions for a couple of other projects) are here in this pdf. Good luck! I’m off to go do some sewing.
UPDATE: Okay, because Meredith P. asked, and Meredith P is a lovely faithful reader, I’ll help you out a little bit, even though helping goes against everything I believe in. The scale is a one square to 1 cm (apparently you can get pattern paper with a 1cm grid, though I’m not sure how readily available this would be in an American sewing store?)
For the Hamilton dress, you need 1.6 meters of ribbed silk (faille perhaps?), two large silver beads and two small silver beads, or two silver-toned “endpieces” for cording (basically something to put at the end of the drawstrings.) They suggest adding 2cm seam allowance and 5cm hem allowance. For the arm openings, you need 4 bias strips of 55 cm each, and for the neck opening you need 4 bias strips of 70 cm in length. For the four drawstring pieces, you need 3 x 60 cm bias strips.
For the Pecoraro ensemble you need .85 meters of light blue crepe de chine, and 1.2 meters of green crepe de chine for the overblouse, and two hooks and eyes. Same 1 square = 1 cm ratio. Seam allowances are 2 cm everywhere except on the arm and neck opening, which is 1 cm. For the tank, you need 2 bias strips of 4 x 50 cm, and 1 bias strip of 4 x 70cm. For the wrap blouse you need 2 bias strips of 4 x 55 cm and one bias strip of 4 x 30 cm.


